
Supported formats
Pageflex Studio supports the following image formats: TIFF, EPS*, JPEG**,
PDF, and GIF.
* Note that to preview an EPS image in Studio, you must save it with a TIFF preview for a Windows-based computer.
** Note the JPG files shold be stored as normal (baseline) and not progressive (web).
When using images with a transparent backgrund use PDF or EPS with a clipping path stored. If you whant to wrap text around the contours of the clipping path use EPS with a clipping path.
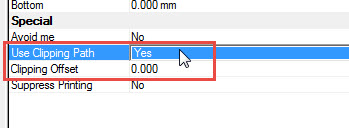
Set Text container to Avoid me = NO, Runaround = YES
Set images container to Avoid me = YES, Use Clipping Path = YES, use clipping offset to desired space from image to text
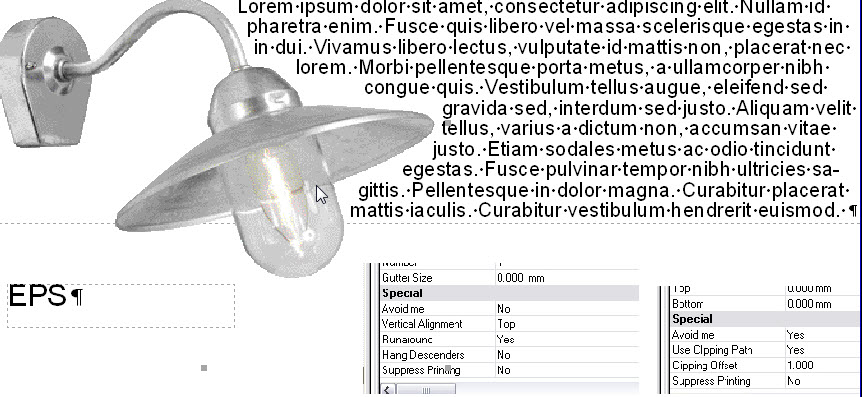
Download a sample template to see this in use.
Crop images
We have launched cropping of images in isave.DIALOG. To use the images must be located in an Area template (for us to know the size we should cropper against). You turn on the feature, that you check the box “Allow image cropping” the image variables.

If cropping does not work make sure try to resize Area Template box and picture frame and insert the new value in mm. We have seen that some Indesgin export sets the value in inches and our calculation is done in mm and then the cropping fails. You could use the same value, but first set the value to a different value (both height and width, in both area template and picture box) then put it back again to its original value using mm.
Image fitting
There are various methods of setting up the Images Studio and some choices have to be taken before one or the other method may be recommended. Download this template to see these methods in use.
1 Should it be section of the image of the retail recommended one of these following settings:
- Fit Image (when the image is aligned to the template)
- Fit Width (when most of the images attached to the template are height images)
- Fit Height (when most of the images attached to the template’s width images)
- Scale to fit (when most photos are unknown and the user still must take a snapshot)
2 If there will be sections of the WYSIWYG one of these these settings (these choices need no Area Template surrounding frame):
- Fit Image (when the image is aligned to the template)
- Fit Width (when most of the images attached to the template are height images)
- Fit Height (when most of the images attached to the template’s width images)
- Scale to fit (when most of the pictures is unknown, suitable for logos, etc. (make sure the frame is bigger than what should be allowed in the template when the picture / logo will try to fill the frame).
- Strech to fit (used in the vectorized patterns that do not have an equal aspect ratio).

3. If the image always should fill the frame .
- Fit Image (Anchor point = Left / Top. FillImage.cs Document action must be used)
This method ensures that the Area template around the picture frame is always filled. But requiring all jobs in the project file are set up Document Action job called FillImage.cs. It is also important that the Print job so FillImages.cs must be above Hires.cs otherwise you will not get the desired result.

Who to add FillImage.CS in your project file job(s):
Select the Document Actions and click the Add button.

Select FillImage.cs from the drop down list.

Set the Class to DocActionsFitImage (only choice).

Set Method to setImagesResize (only choice).

Move the line with FillImage.cs over the line with HiRes.cs to ensure that the Hires script runs as the last script.

Press OK to save and repeat for all jobs in the project file.

Note that this method requires that the frame is set to FitImage (the default setting).

Note that this method requires that the anchor point is set to Left / Top (the default setting).

If there are images in the template not to fill the area template, but to be placed with another method, they must either be placed in the template without an Area Template round picture frame, or name the Area This template around the frame with the word exempt (inserted in the Info tab and the Name field ).

 English
 Norwegian Bokmål