
Issues:
- Customer agrees to use PDF files internally on local printer and can only be accessed on Lowres.PDF file because of system settings.
- Poor quality of logos and other smaller PDF files selected from Files (see solution 2 and 3).
The file is created automatically when you upload photos in Isave is intended as proof and is set in such low quality as possible for a faster generation. The images that auto-generated meant that correction and not as print as this is the wish of many of our customers who do not want the low resolution file will be used as press file, and a standard 72 dpi file will often print completely OK a good laser printer / inkjet printer.
If you make use of Solution 3: (Use the same HiRes document action at work lowres and or Preview job at work Print) will PDF / Preview generation based on original file that was uploaded in Isave and even if you do not change 72 dpi settings will this look better than today lowres, then file uses original file instead of the auto generated image file as a starting point for the generation. As mentioned, this is done lest lowres to have any value in the pressure connection as standard, but the option (s) is the words there if you want it differently.
Solution 1: Set HiRes setting on the template to Always available, which will enable the customer to download the high-resolution PDF file. This method is clearly the fastest because the files already is created in isave.DIALOG.

Solution 2: reupload the original file to replace the Auto-generated Lowres file under the logo/image Admin and the button Upload Lowres.
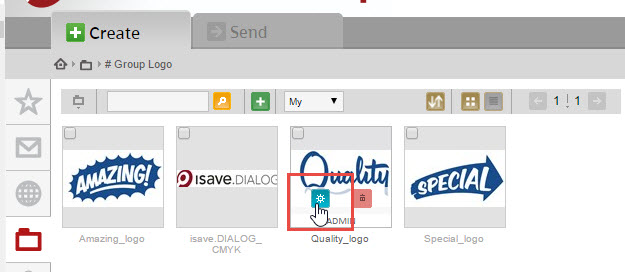
First click on the blue admin button on the logo / image:
Then override the auto-generated file with original file by clicking the button Upload Lowres and upload PDF or JPG File you uploaded in the first place. This will replace the automatically generated file in isave.DIALOG.
The auto-generated file created is intended as proof and not as print as this is the wish of many of our customers who do not want the proof file to be be misused.
This method is appropriate if templates are already created and uploaded in isave.DIALOG and the number of images is less than the number of templates.
Solution 3: Use the same HiRes document action for the Preview or Lowres job as for the Print job.
This method is appropriate if templates have not yet been made or the number of templates are fewer than the number of images.
Start by opening the project file and select the tab Jobs and double-click on the job Lowres and click the option Document Actions and select radio button Custom Actions.

Click Add and select Hires.cs from the drop down list.

Select Samples from the Class drop down.

Select UseHiResImagePath from the Method drop down.

Click OK to save your changes.

If you want a different resolution than 72 dpi file (standard setting in the default isave.DIALOG project file) change this under the button Properties and the tab Image.

Set the alternate DPI under the Downsampling section.

 English
 Norwegian Bokmål